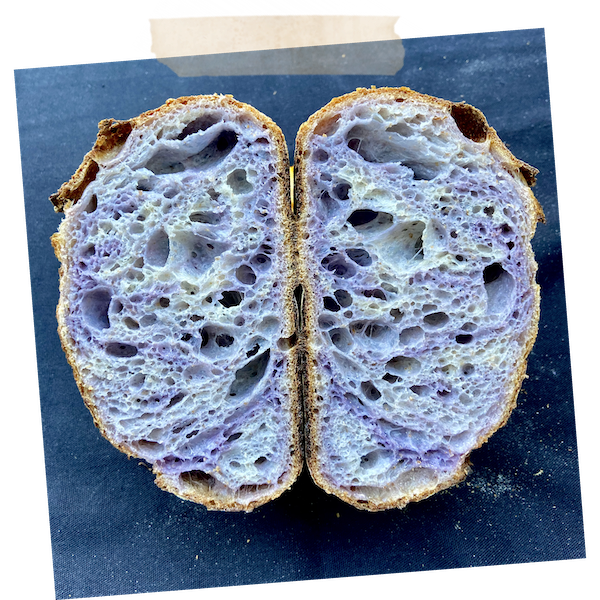
It is soft, light, purple… delicious 😋 That’s how I describe the purple sweet potato sourdough bread.
It is so much fun to work with the purple dough.
And how great is it to have a purple sandwich bread made from natural products?
Ingredients
Sourdough starter
- 5g sourdough starter
- 35g water
- 30g all purpose flour or bread flour
- 5g rye flour
Dough
- 270g high gluten flour (90%)
- 30g whole grain whole wheat flour (10%)
- 207g water (69%)
- 60g levain (20%)
- 6g salt (2%)
After the dough is divided in two pieces:
- 9g water (6%) for the dough #1
- 100g boiled and mashed purple sweet potato for the dough #2
Directions
Starter
Night before
- 10 pm add starter to the water and whisk together, add flour, mix well, cover loosely, let it sit at room temperature at 74-78F until in about 10-12 hours starter reaches its peak (triples or more in volume).
- Boil purple sweet potatoes, let them cool overnight.


- Learn how to make starter from scratch here.
Dough
- 7 am mix water with bread flour and cover it, let it rest 1 hour for autolyse. During the autolyse process the flour absorbs water, becoming fully hydrated. This activates gluten development.
- 8 am add sourdough starter.
- Mix on low speed of your mixing machine for 2-3 min, or KitchenAid on speed 3 for 3-4 minutes until well incorporated.
- Cover and let it rest for 30 min.
- 8:30 am add salt and mix on low speed of your mixing machine for 1-2 minutes, or KitchenAid on speed 3 for 2-3 minutes until well incorporated.
- Divide the dough in 2 equal pieces.
- Add extra water to the dough #1
- Add purple sweet mashed potato to the dough #2.


- Using your hands or mixer incorporate water into the dough #1 and purple sweet potato into the dough #2.
- For both pieces the dough should come up together, but still be sticky. We will continue gluten development and structure building by performing stretches and folds during warm fermentation period. Cover both dough pieces.
- Leave to rest for 30 min. At 74-78F /23-26C.
Lamination
- 9 am wet your hands and spray table with water. Stretch the first and second dough pieces separately, then place one on top of another, fold them and let rest 30 min.


- 9:30 am 1st stretch and fold.

- 10:15 am 2nd stretch and fold.
- 11:00 am 3rd stretch and fold.
- Performing stretches and folds every 45 min will help to continue gluten development.
- Keep monitoring the dough, if it’s rising too fast, you can shorten time in between stretches to 40 minutes or less.
- After the final stretch let the dough proof for 40 minutes at 76-80F/ 23-26C. You should see some bubbles on the surface, the dough has to become lighter. We are looking for 40%-50% rise.
Preshaping
- 11:40 am transfer dough to a work surface and dust the top with flour. Then flip the dough over so the floured side faces down.
- Fold the dough onto itself so the flour on the surface remains entirely on the outside of the loaf. This will become the crust.
- Place the dough round on a work surface and let it rest for 30 minutes uncovered.
Shaping
- 12:10 pm dust the dough with flour. Use a dough scraper to flip it over onto a work surface so floured sides are facing down.
- Starting at the side closest to you, pull the right 2 corners of the dough to the left, then fold them up into half of the dough. Repeat this action on the left side too.
- Finally, roll the dough. Shape it into a smooth, taut roll.
- Transfer the roll, seam side up into a prepared proofing basket (loaf pan with kitchen towel)
- Cover it with plastic and return the dough to the 80F (27C) environment for 15 min.
- 12:25 pm transfer dough to rise for 14-24 hours in the refrigerator.
Baking
Next morning
- Preheat the oven to 500 F, place your cast iron pan with the lid inside for 45 minutes -1 hour.
- Remove the dough from the fridge.
- Flip it over on a parchment paper, score it with a sharp knife or a bread lame.
- Transfer it to the hot cast iron pan, cover it with the lid (to create steam for a beautiful and crusty crumb).
- Bake at 500F for 15 minutes with the lid on.
- Remove the lid, lower the temperature to 450F.
- Bake for 20 more minutes until golden brown.


Let it cool for 2 hours and enjoy your purple sweet potato sourdough.
Disclosure: As an Amazon Associate I earn from qualifying purchases.
gorgeous ….like ever you are 👌🏻
Thank you ☺️
Hi Natasha, can I use kabocha instead of purple sweet potato? I have some steamed kabocha left in my fridge
Hi! I think you can, but use less water at the beginning.
And if dough will be stiff, add more with salt 🙏
Hi! Do you think it’s possible to use King Arthur Bread Flour instead of the High Gluten Flour? Last time I tried this with a different bread flour and it turned out too wet and sticky, probably because there was too much liquid in the sweet potatoes.
King Arthur bread flour is right choice too.
Good luck 🙏
Hi! Is there any reason besides aesthetics that you divide the dough into purple and white?
White part will serve as a frame for the whole loaf, because purple part have less strength 🙏
Oh got it! Thank you! Getting ready to bake my loaves now! I made the purple potato sandwich loaf and it was amazing!
Thank you! Happy you liked it 🙏
Hi. Can I use purple sweet potato powder and if so, how much should I use? When do I add it to my dough?