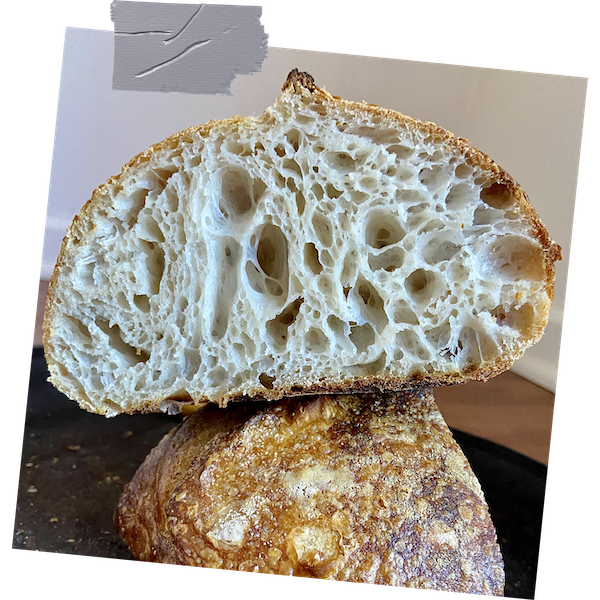
Semolina adds creaminess to the sourdough loaf and gives it lightness.
This is a great option to add something new to your regular sourdough loaf.
I baked it many times before, and previously I have been mixing semolina with hot water first, because I was afraid that grainy semolina will be heavy for the loaf.
But in this recipe I wanted to try it straight from the bag, and it worked just perfect.
Ingredients
Sourdough starter
- 5g sourdough starter
- 35g water
- 30g all purpose flour or bread flour
- 5g rye flour
Dough
- 240g bread flour (80%)
- 60g semolina flour(20%)
- 207g water (69%)
- 30g (10%) cold water added along with salt. Total hydration 79%
- 60g levain (20%)
- 6g salt (2%)
Directions
Starter
- 7 am add starter to the water and whisk together, add flour, mix well, cover loosely, let it sit at room temperature 74-78F until in about 8-10 hours starter reaches its peak (triples or more in volume). Learn how to make starter from scratch here.
Dough
- 5 pm mix water with all flour and cover, let it rest for 1 hour to complete the autolyse.
- During the autolyse process the flour absorbs the water, becoming fully hydrated. This activates gluten development.


- 6 pm add sourdough starter.
- Mix on low speed of your mixing machine for 2-3 minutes, or KitchenAid on speed 3 for 3-4 minutes until well incorporated.
- Also if for some reason you don’t have a mixing machine, you can incorporate starter into the dough by hands. Using Rubaud method or slap and fold method (about 5-7 min).
- Cover, let it rest for 30 minutes.
- 6:30 pm add salt and extra water.
- The process of adding extra water is called bassinage, it helps to tighten up gluten. Mix on low speed of your mixing machine for 2-3 min, or with KitchenAid on speed 3 for 5-6 minutes until well incorporated. The dough should come up together, but still be sticky on the bottom.
- Please note, if you perform mixing by hands, using Rubaud method or slap and fold method, that takes about 10 minutes. Do a couple of stops in between kneading, it helps tightening up gluten.
- Continue gluten development and structure building by performing stretches and folds during the warm fermentation period.
- Leave to rest 30 min. At 74-78F /23-26C.
- 7 pm wet your hands and perform 1st stretch and fold.
- 7:45pm 2nd stretch and fold.
- 8:30 pm 3rd stretch and fold.
- 9:15 pm 4th stretch and fold.


Performing stretches and folds helps with gluten development. Keep monitoring the dough, if it rises too fast, you can shorten the time between stretches to 40 minutes or less.
- After the final stretch let the dough proof for 30 minutes at 76-80F/ 23-26C. You should see some bubbles on the surface, the dough has to become lighter. We are looking for 40%-50% rise.

Preshaping Sourdough
- 9:45 pm Transfer the dough on to a work surface and dust its top with flour. Flip the dough over so the floured side faces down.
- Fold the dough onto itself so the flour on the surface remains entirely on the outside of the loaf. This will become the crust.
- Place the dough round on a work surface and let it rest for 30 minutes uncovered.
Shaping Sourdough
- 10:15 pm dust the dough with flour. Use a dough scraper to flip it over on to a work surface so the floured side faces down.
- Starting at the side closest to you, pull the right 2 corners of the dough to the left, then fold them up into half of the dough. Repeat this action on the left side too.
- Finally, roll the dough. Shape it into a smooth, taut roll.
- Transfer the roll, seam side up, into a prepared proofing basket (loaf pan with kitchen towel).
- Cover it with plastic and return the dough to the 80F (27C) environment for 15 minutes.
- Then transfer the dough to rise for 14-24 hours in refrigerator.
- Preheat your oven to 500 F, place a cast iron pan with the lid inside for 45 minutes – 1 hour.
- Remove the dough from the fridge.
- Flip it over on a parchment paper, score it with a sharp knife or a scoring lame.
- Transfer it on to the hot cast iron pan, cover with lid (to create steam for a beautiful and crusty crumb).
- Bake at 500F for 15 minutes with lid on.
- Remove the lid, lower temperature to 450F.
- Bake for 20 more minutes until golden brown.


Enjoy your semolina sourdough loaf 🙏
Disclosure: As an Amazon Associate I earn from qualifying purchases.
Hi Natasha,
Thank you for your kindness in sharing the recipe with us. Do you separate a small portion of your dough after adding salt to it to follow up with the rise of your dough? Because I saw you have a jar showing how much it raised. I’m not good seeing if mine raised enough. Thank you again.
Erica, hi!
Yes, exactly. After salt addition I’m pinching out small amount of the dough, and placing it in the jar, to track the rise.
Hope it will help 🙏
Amazing. I never thought about doing that. Brilliant! Thank you again.
As always, beautiful bread. You are so talented! And also so kind, sharing your knowledge with us. I’ve learned more following you baker journal than with any class/bread book/anything else.
Thank you for the hard work!!!
Tamara! Thank you so much for your kind feedback.
It means a lot to me 🙏
Hi. Nastalya,
May i have a question what is the purpose to check temperature between every stretch and fold ?
Hi… is the amount of starter i
Right? 5 grams?
Thanks
5g to feed the starter (levain) you’ll use in the dough .
Total amount for the dough-60g levain
Thanks so much for the great recipes!! Is there a way to change the timing of the semolina loaf.
Laurinda, hi!
Sure, you can adjust the time regarding your schedule.
Hey Natasha!! Thanks for sharing this with us you really are amazing!🙌. I followed the recipe and ingredients step by step but ended up with a way too wet and sticky dough 😢. Any advice for this? Maybe mix it a little longer after adding salt and water? Thanks again!
Diego, hi!
Sorry to hear it didn’t work for you.
Sometimes (depends on flour, temperature and hydration of air) consistency of the dough can change.
With longer mixing and stops in between mixing, it could come up together.
Please check my advice on how to work with the dough when it’s falling apart ( it’s in Sourdough tricks post )
Natalya. Another great bread. Thanks. Do you only take the small piece of the dough after adding the salt to let it rise, right?. Is that the only time? I am starting the loaf today. Thanks.
Sorry, I might be too late. But yes, I take small amount of the dough just once 🙏
Hi Natasha, I followed the recipe and the Preshaping Sourdough found little bit unclean to me, how many time I need to flip the dough? Do you have any video of Preshaping Sourdough ? Many thanks for your recipe! Lara.
Lara, hi!
Sorry that preshaping was confusing for you.
Please check my Instagram page, I was sharing preshaping videos in my highlighted stories 🙏
Hi Natasha, thank you for this. Bread looks amazing. Not sure if you already do, but try this with Durum Semolina flour. It’s super finely milled and makes the dough even more smooth and fluffy than gritty semolina (which is also nice). You will never go back to regular semolina flour!
Thank you, Michael!
I already did, and I’m 100% agree with you. Loved it 🙏
Do you use 100% finely milled semolina flour only?
Natasha, I have baked several hundred loaves of sourdough bread. I have baked scores of sourdough bread with semola, but my crumb is always pretty tight. I have never achieved anything close to your very open crumb. I use sourdough recipes that call for a first rise, then a relatively fast rise for an hour or two when the dough is shaped.
But, although you don’t say so, I am inferring that your extremely open crumb comes from the long intervals between multiple folds, followed by a very long final proofing in the fridge.
Am I right? The cold final proofing I have know about for years, but I use banneton and no matter how generously I flour them, the dough sticks badly to the basket after being in the fridge all night.
Please comment, I would appreciate it.
I use a linen or cotton tea towel in the banneton, then dusted lightly with AP flour, and then with rice flour, and place the shaped loaf into. I then fold the “extra” tea towel, that is hanging over the sides of the banneton lightly over the top, and place in fridge for cold proof. The rice flour is amazing for this!