Flaky Danish Dough
I have been looking for a good flaky Danish dough recipe for quite some time. The easiest way is to use croissant dough for Danishes, but I wanted something lighter, sweeter, and flakier with a more delicate texture and softer bite. I was searching for a dough that would create beautifully crisp layers while still feeling tender and airy once baked — the kind of pastry you would expect to find in a high-end bakery.
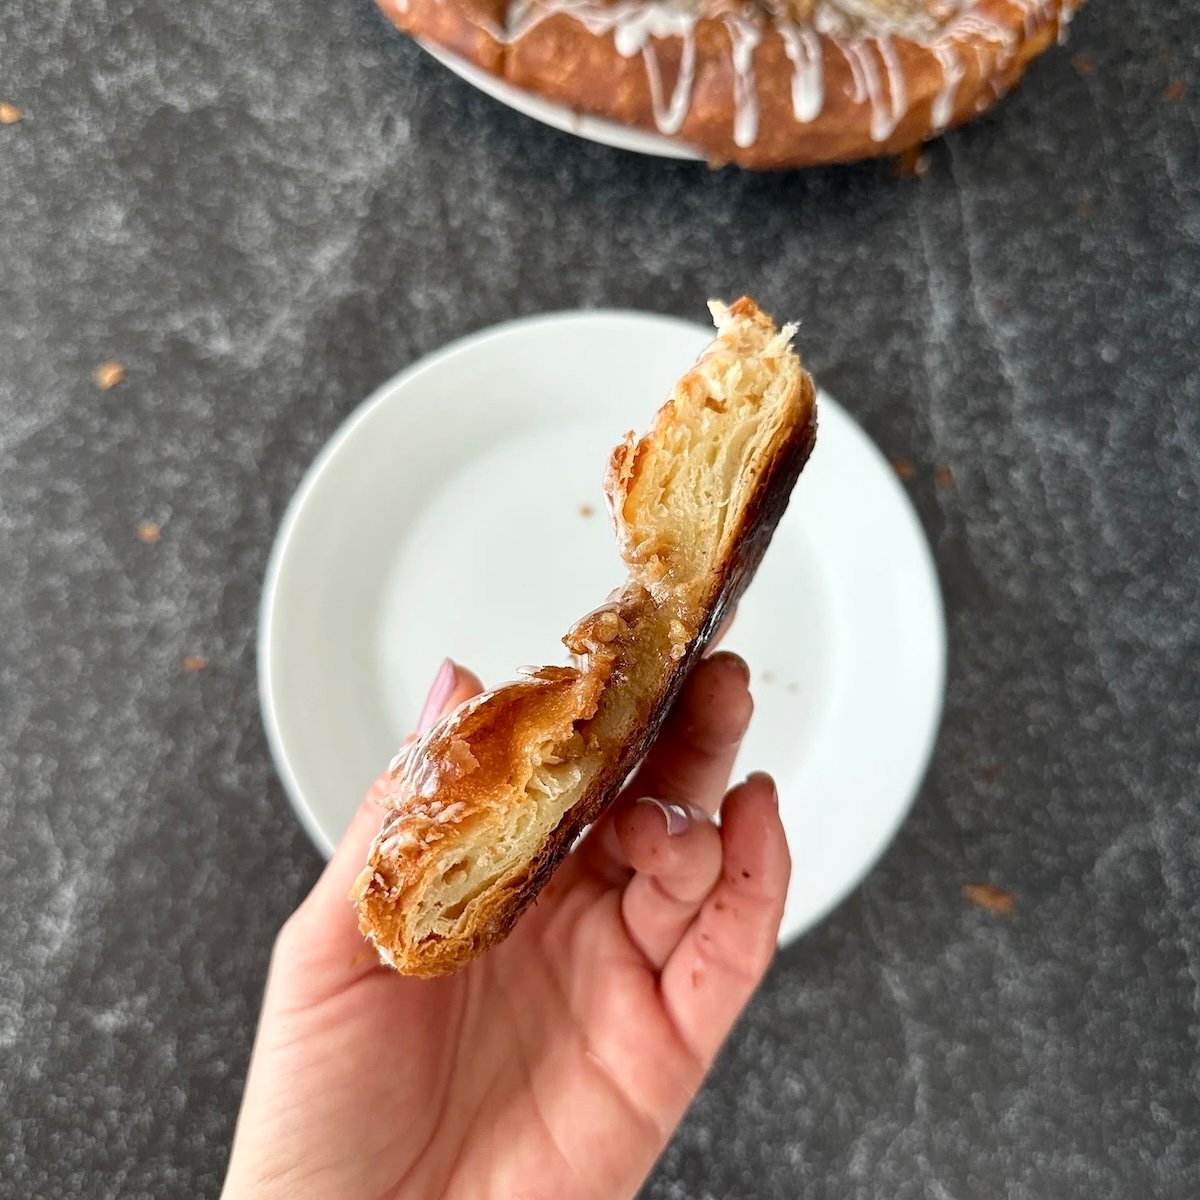
After multiple rounds of testing, adjusting hydration levels, experimenting with butter ratios, and refining the lamination process, this flaky Danish dough recipe finally came together exactly the way I imagined. The result is a dough that produces elegant pastries with thin, buttery layers, light sweetness, and incredible texture. It bakes into pastries that are crisp on the outside, soft inside, and wonderfully rich without feeling too heavy.
One of the biggest differences between croissant dough and true Danish dough is the balance between richness and tenderness. Danish dough is slightly more enriched, giving it a softer texture and more delicate crumb while still maintaining those beautiful laminated layers. The dough is easier to work with than many traditional pastry recipes and creates consistent, bakery-quality results once you understand the folding and resting process.
Another reason I love this recipe is its versatility. This dough can be used for classic fruit Danishes, cream cheese pastries, cheese pockets, Kringle, cinnamon twists, almond-filled pastries, braided pastries, or almost anything of that nature. It works beautifully with seasonal fruit fillings, jams, pastry cream, chocolate, nuts, or savory combinations if you want to experiment further. Once you master the base dough, the possibilities become nearly endless.
Although laminated dough can seem intimidating at first, this recipe is designed to make the process approachable and enjoyable. Taking your time during resting periods and keeping the butter and dough at the proper temperature are the keys to success. Once you become comfortable with the process, it becomes surprisingly relaxing and satisfying.
Whether you are preparing pastries for breakfast, brunch, holidays, special gatherings, or simply for the joy of baking, this Danish dough recipe is one worth keeping and returning to again and again. It has quickly become one of my favorite laminated dough recipes, and I truly hope you enjoy working with it as much as I do.
Ingredients
Dough (for 12 danishes)
- 320g bread flour
- 120g lukewarm milk
- 6g dry instant yeast
- 100g sugar
- 1 egg
- 50g soft butter (for the dough)
- 6g salt
- 150g cold butter for lamination +2 tbs of flour
Directions
Night before
- Add lukewarm milk and egg to a bowl.
- Dissolve yeast in liquid mixture, add sugar, whisk all together, add flour and knead on medium speed of your mixing machine until dough will come up together (about 5-7 min)
- Add salt and soft butter, continue kneading on medium high speed until strong gluten developed , and dough will clear out the bowl (about 15 min)
- Cover the dough in plastic wrap, let rest at 28C /82F for about 1 hour, then put in the fridge until next morning.
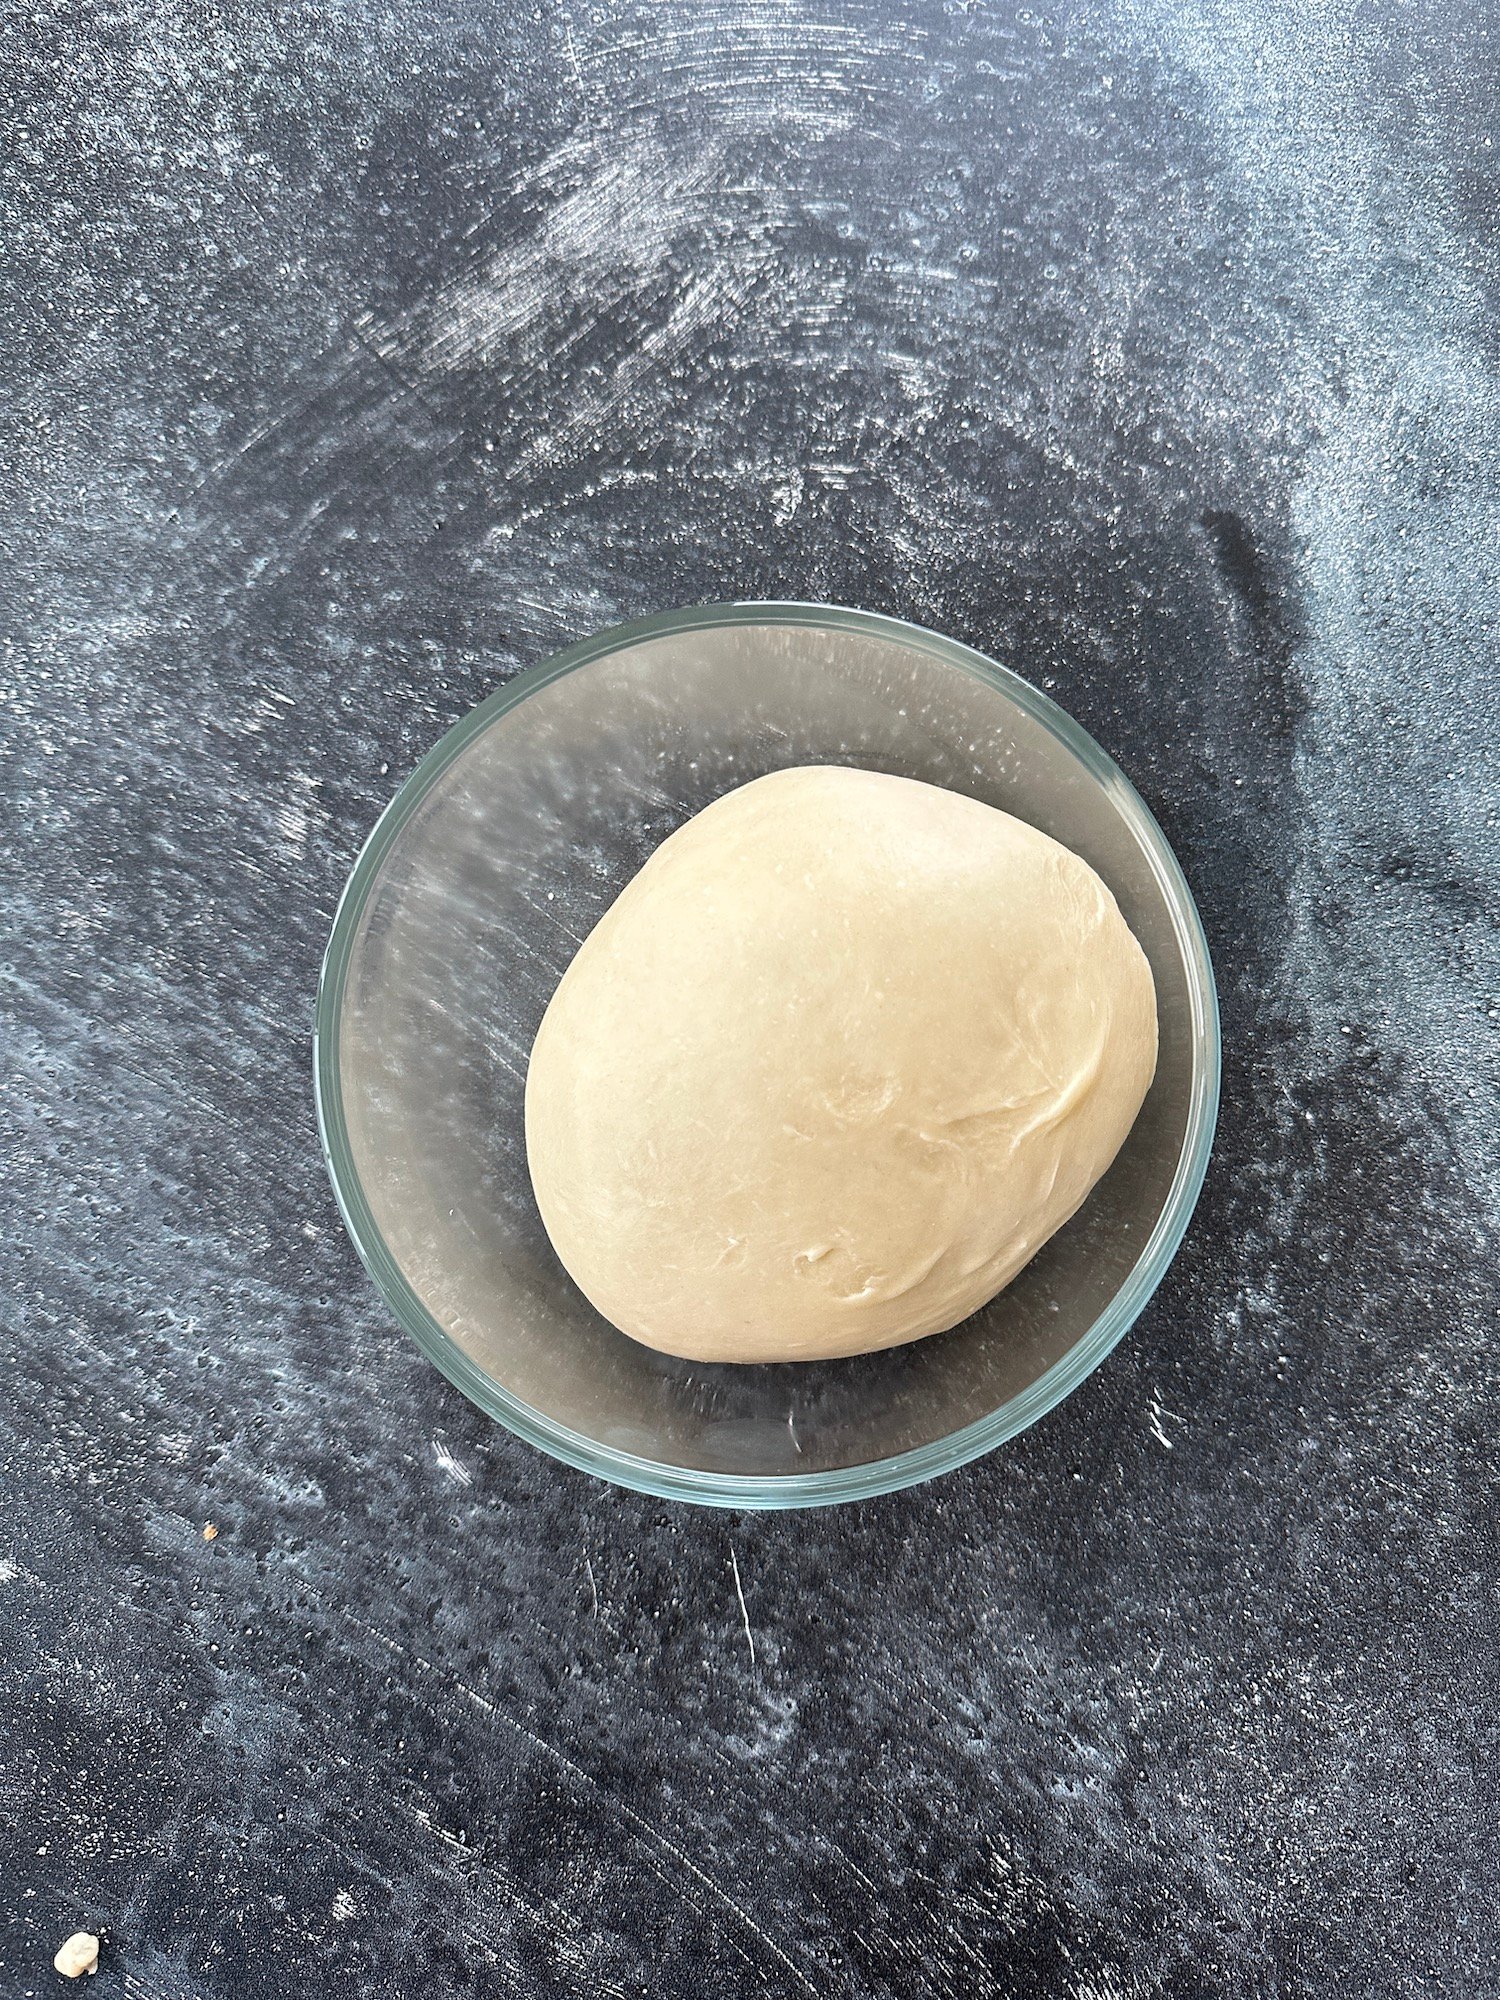
Next day
- Remove the dough from fridge, roll it as rectangular about 20cm x 60cm / 7.8 inches x 23.6 inches)
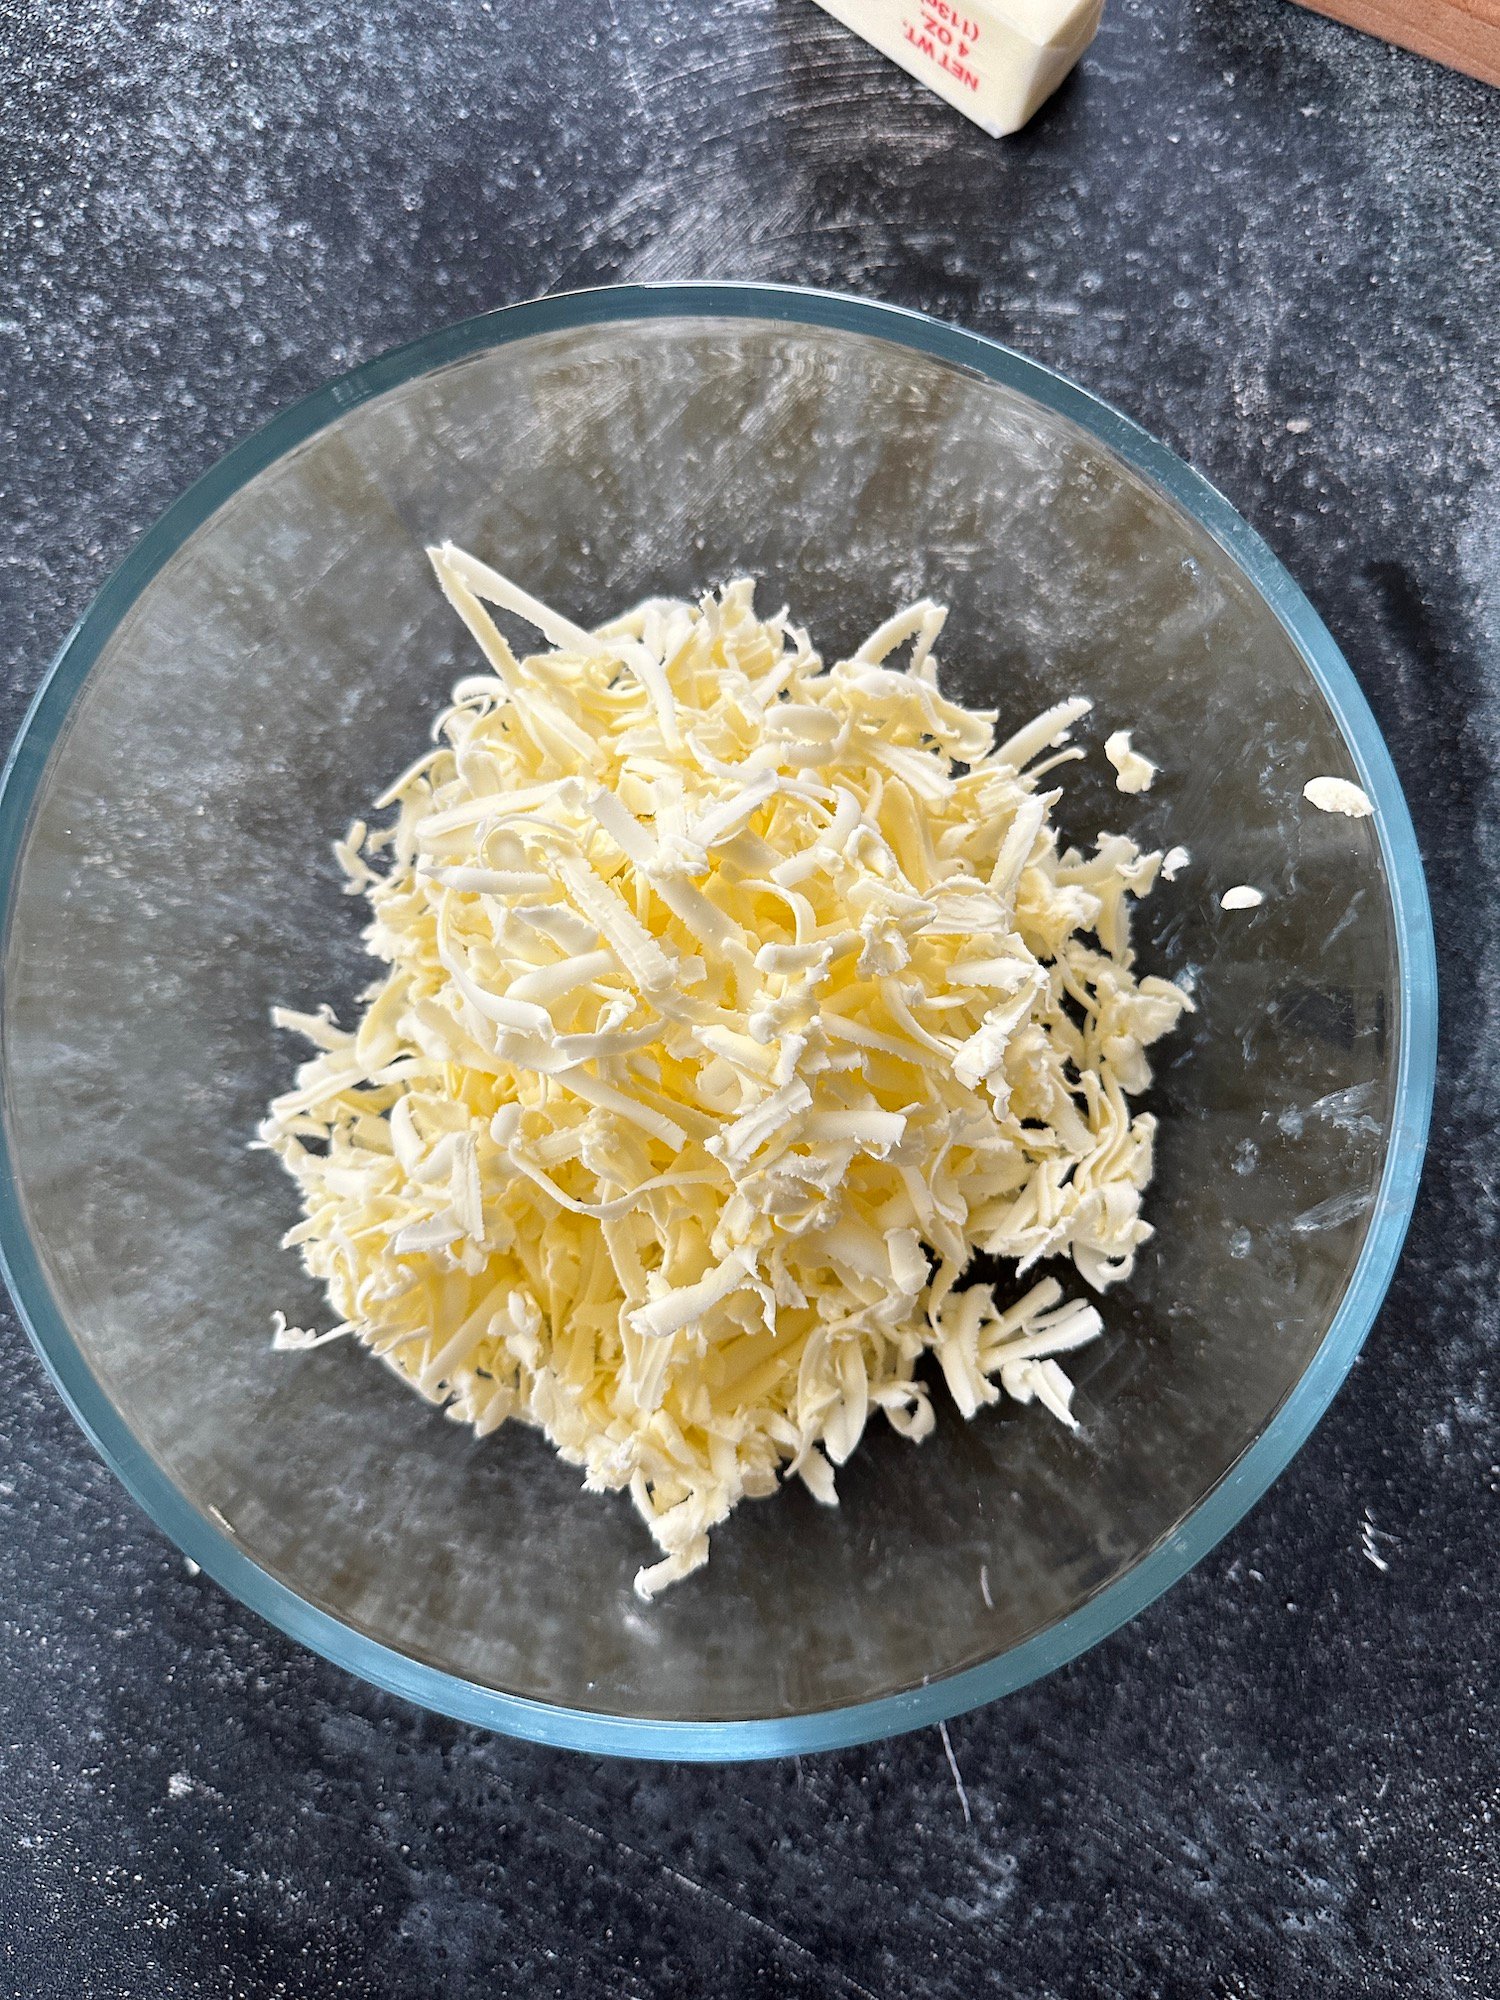
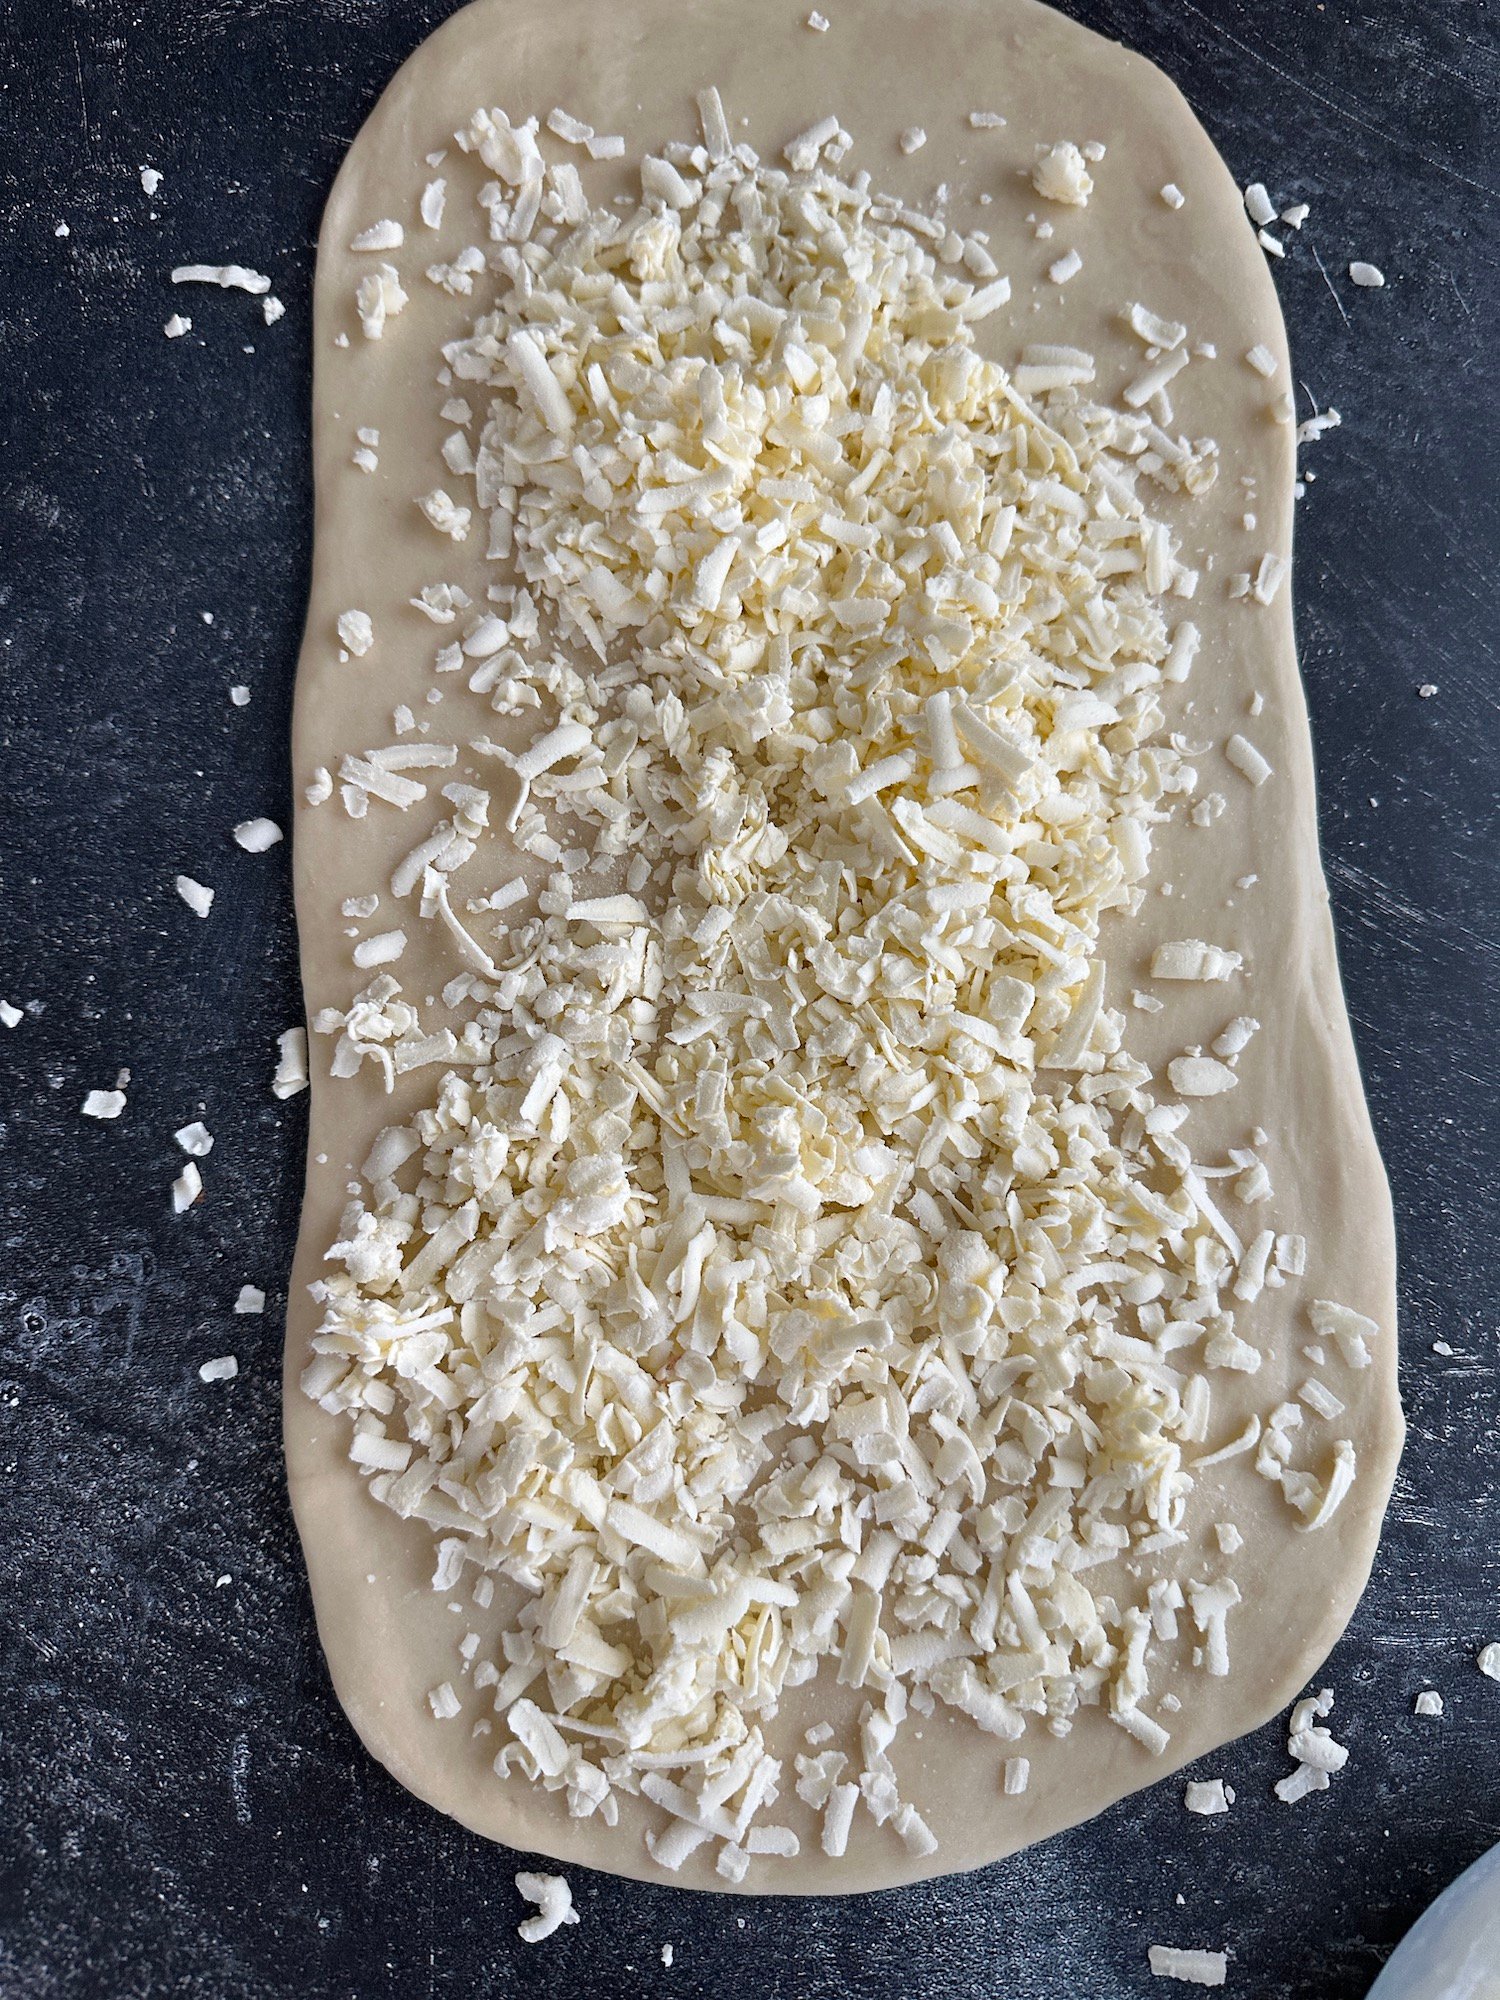
- Shred the ice cold butter and sprinkle it with 2tbs flour, shake it well and sprinkle butter all over the dough.
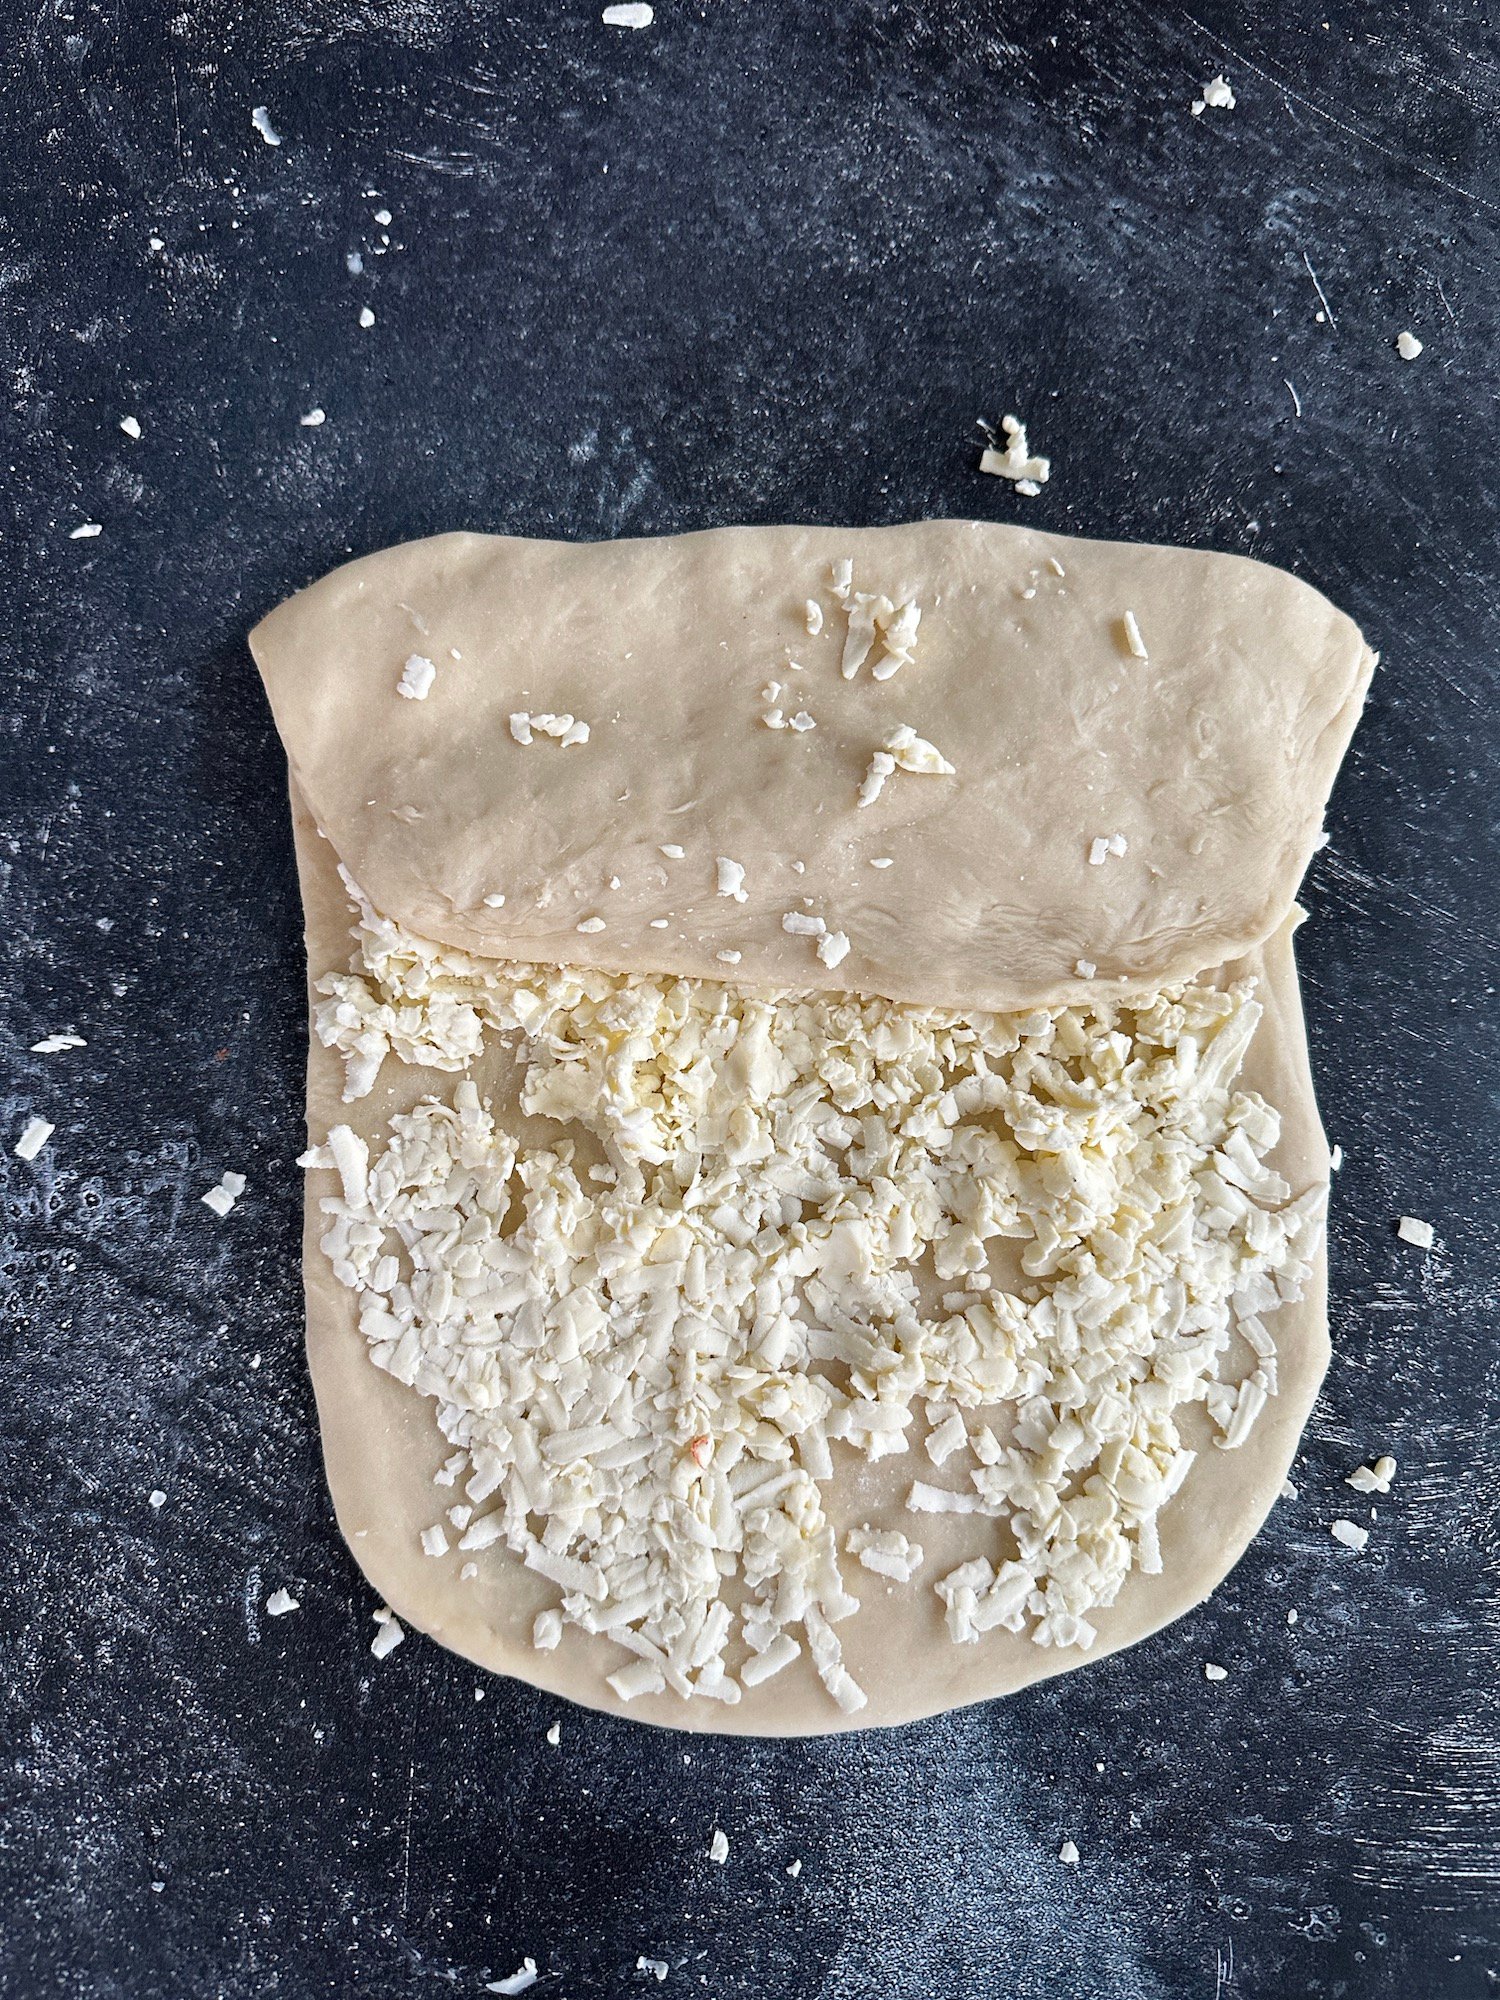
- Fold one part of the dough to cover 2/3 of the dough fold the other 1/3 of the dough over (so the dough will look as a letter)
- Roll the dough again as rectangular about 20cm x 60cm / 7.8 inches x 23.6 inches), fold as a letter.
- Cover move to fridge to rest for about 1 hour.
- Repeat rolling and letter folding for 1 more time. Move to fridge for 1 hour.
- Remove your dough from fridge, it is ready for shaping.
- Shape danishes the way you like, let them proof until doubled or little more for 3-5 hours.
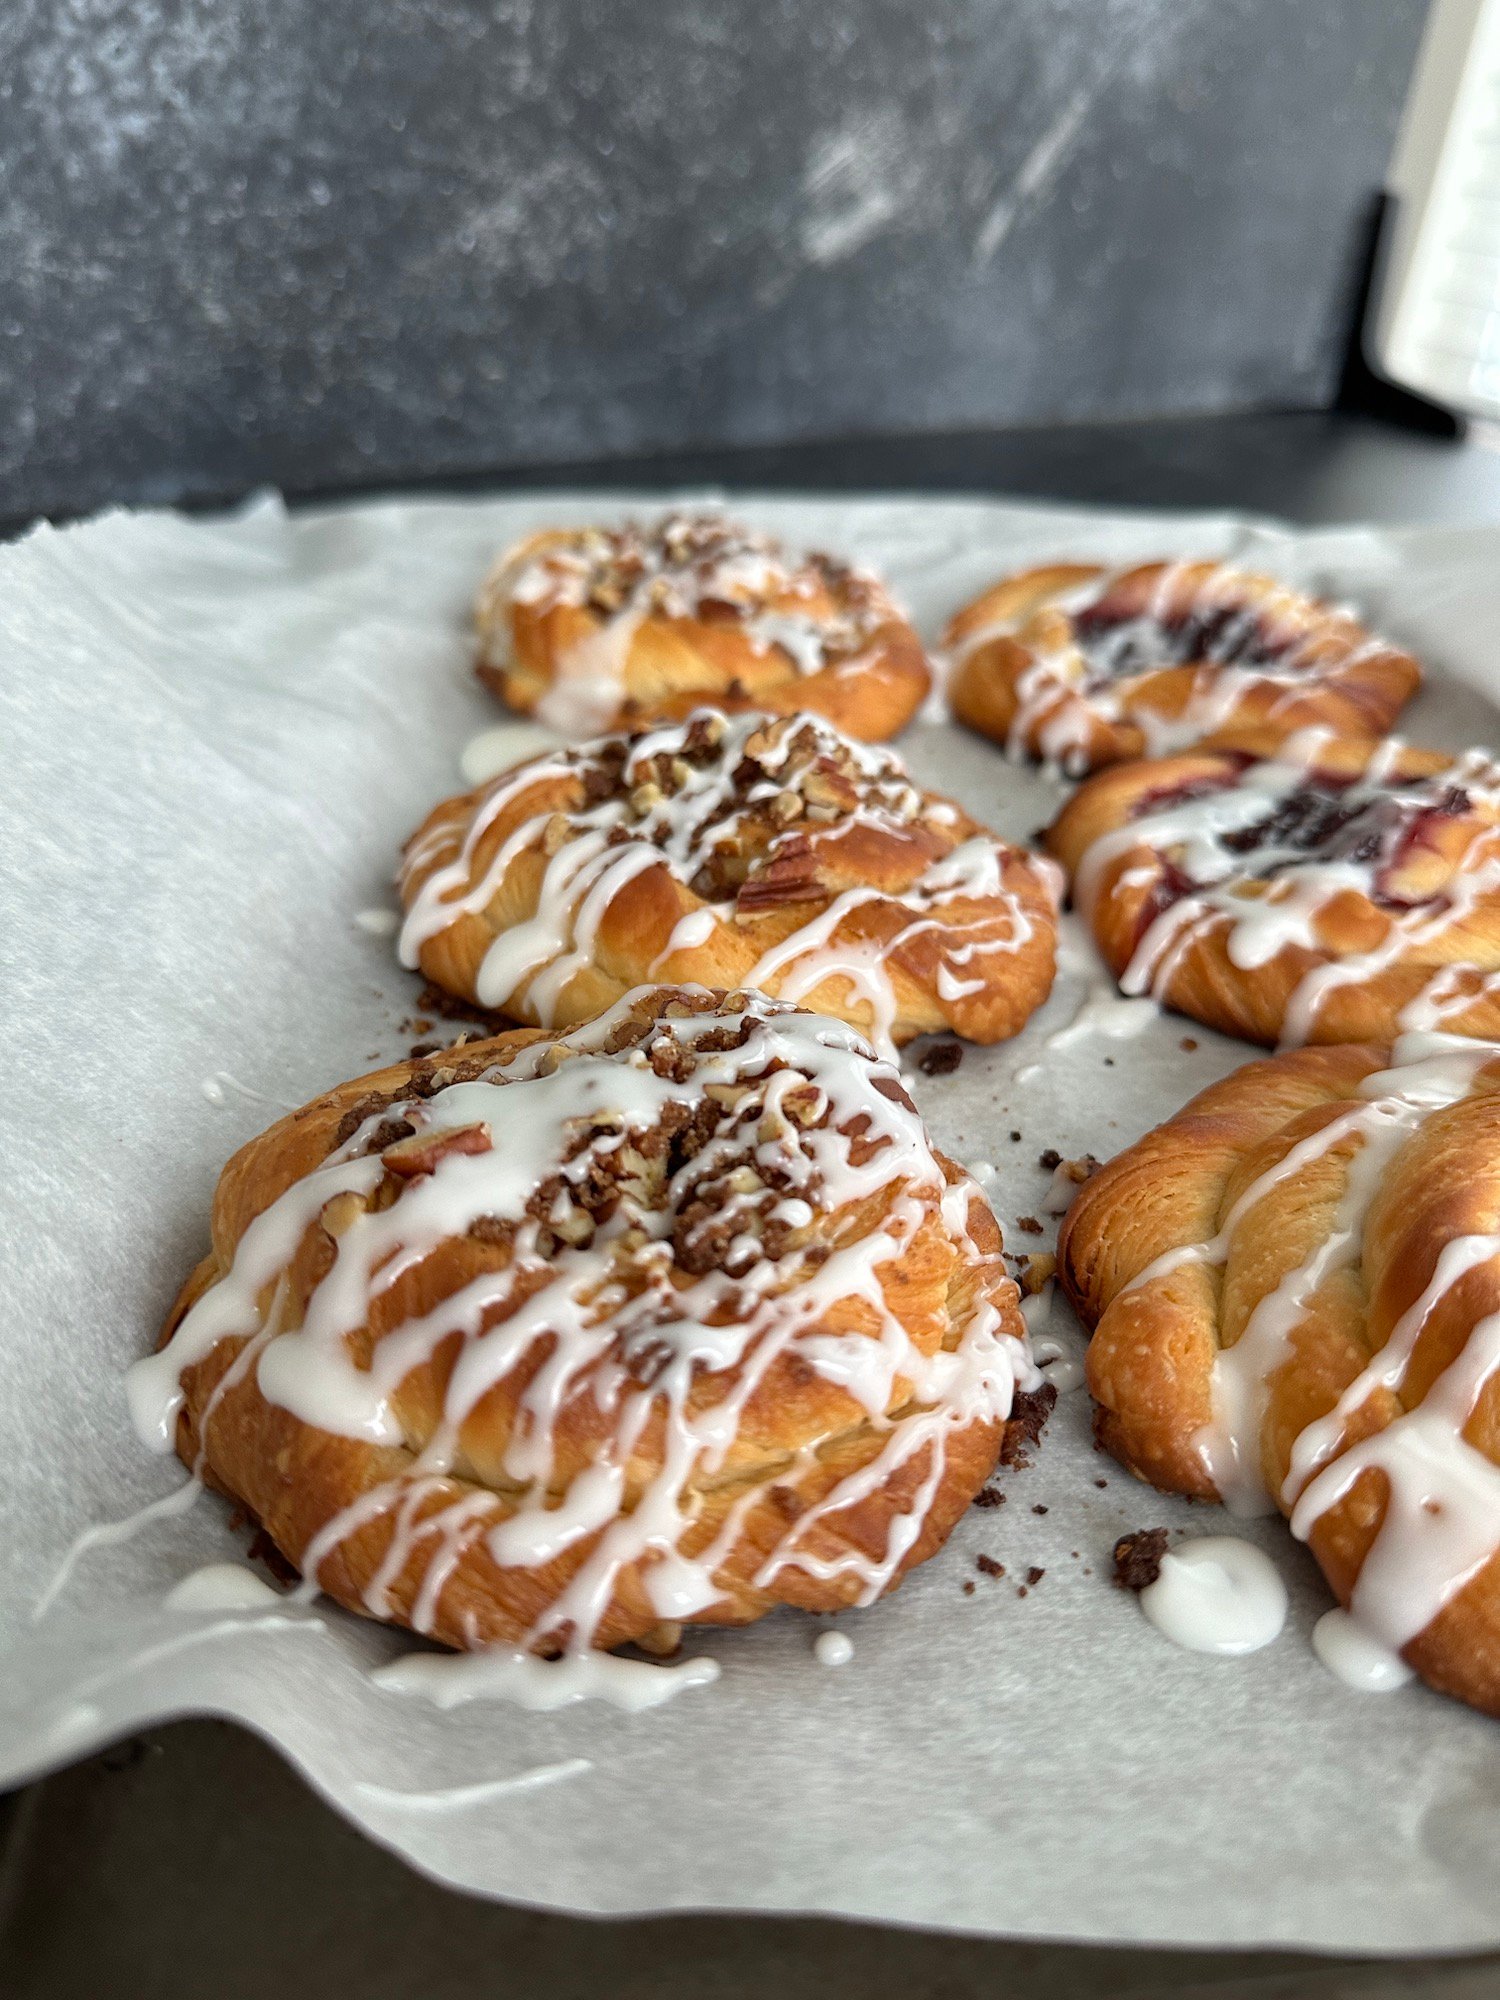
- Bake at 350F for 20-22 min
- Enjoy.
- Notes: Below you can see the ideas of shaping as a Kringle.
- From this amount of the dough you can get 2 Kringles. Roll the dough, cut into a 2 stripes , prepare the filling by mixing, 1/2 cups of brown sugar,1/2 stick butter and 1/2 cup chopped pecans. place the filling in the middle and pinch the edges.
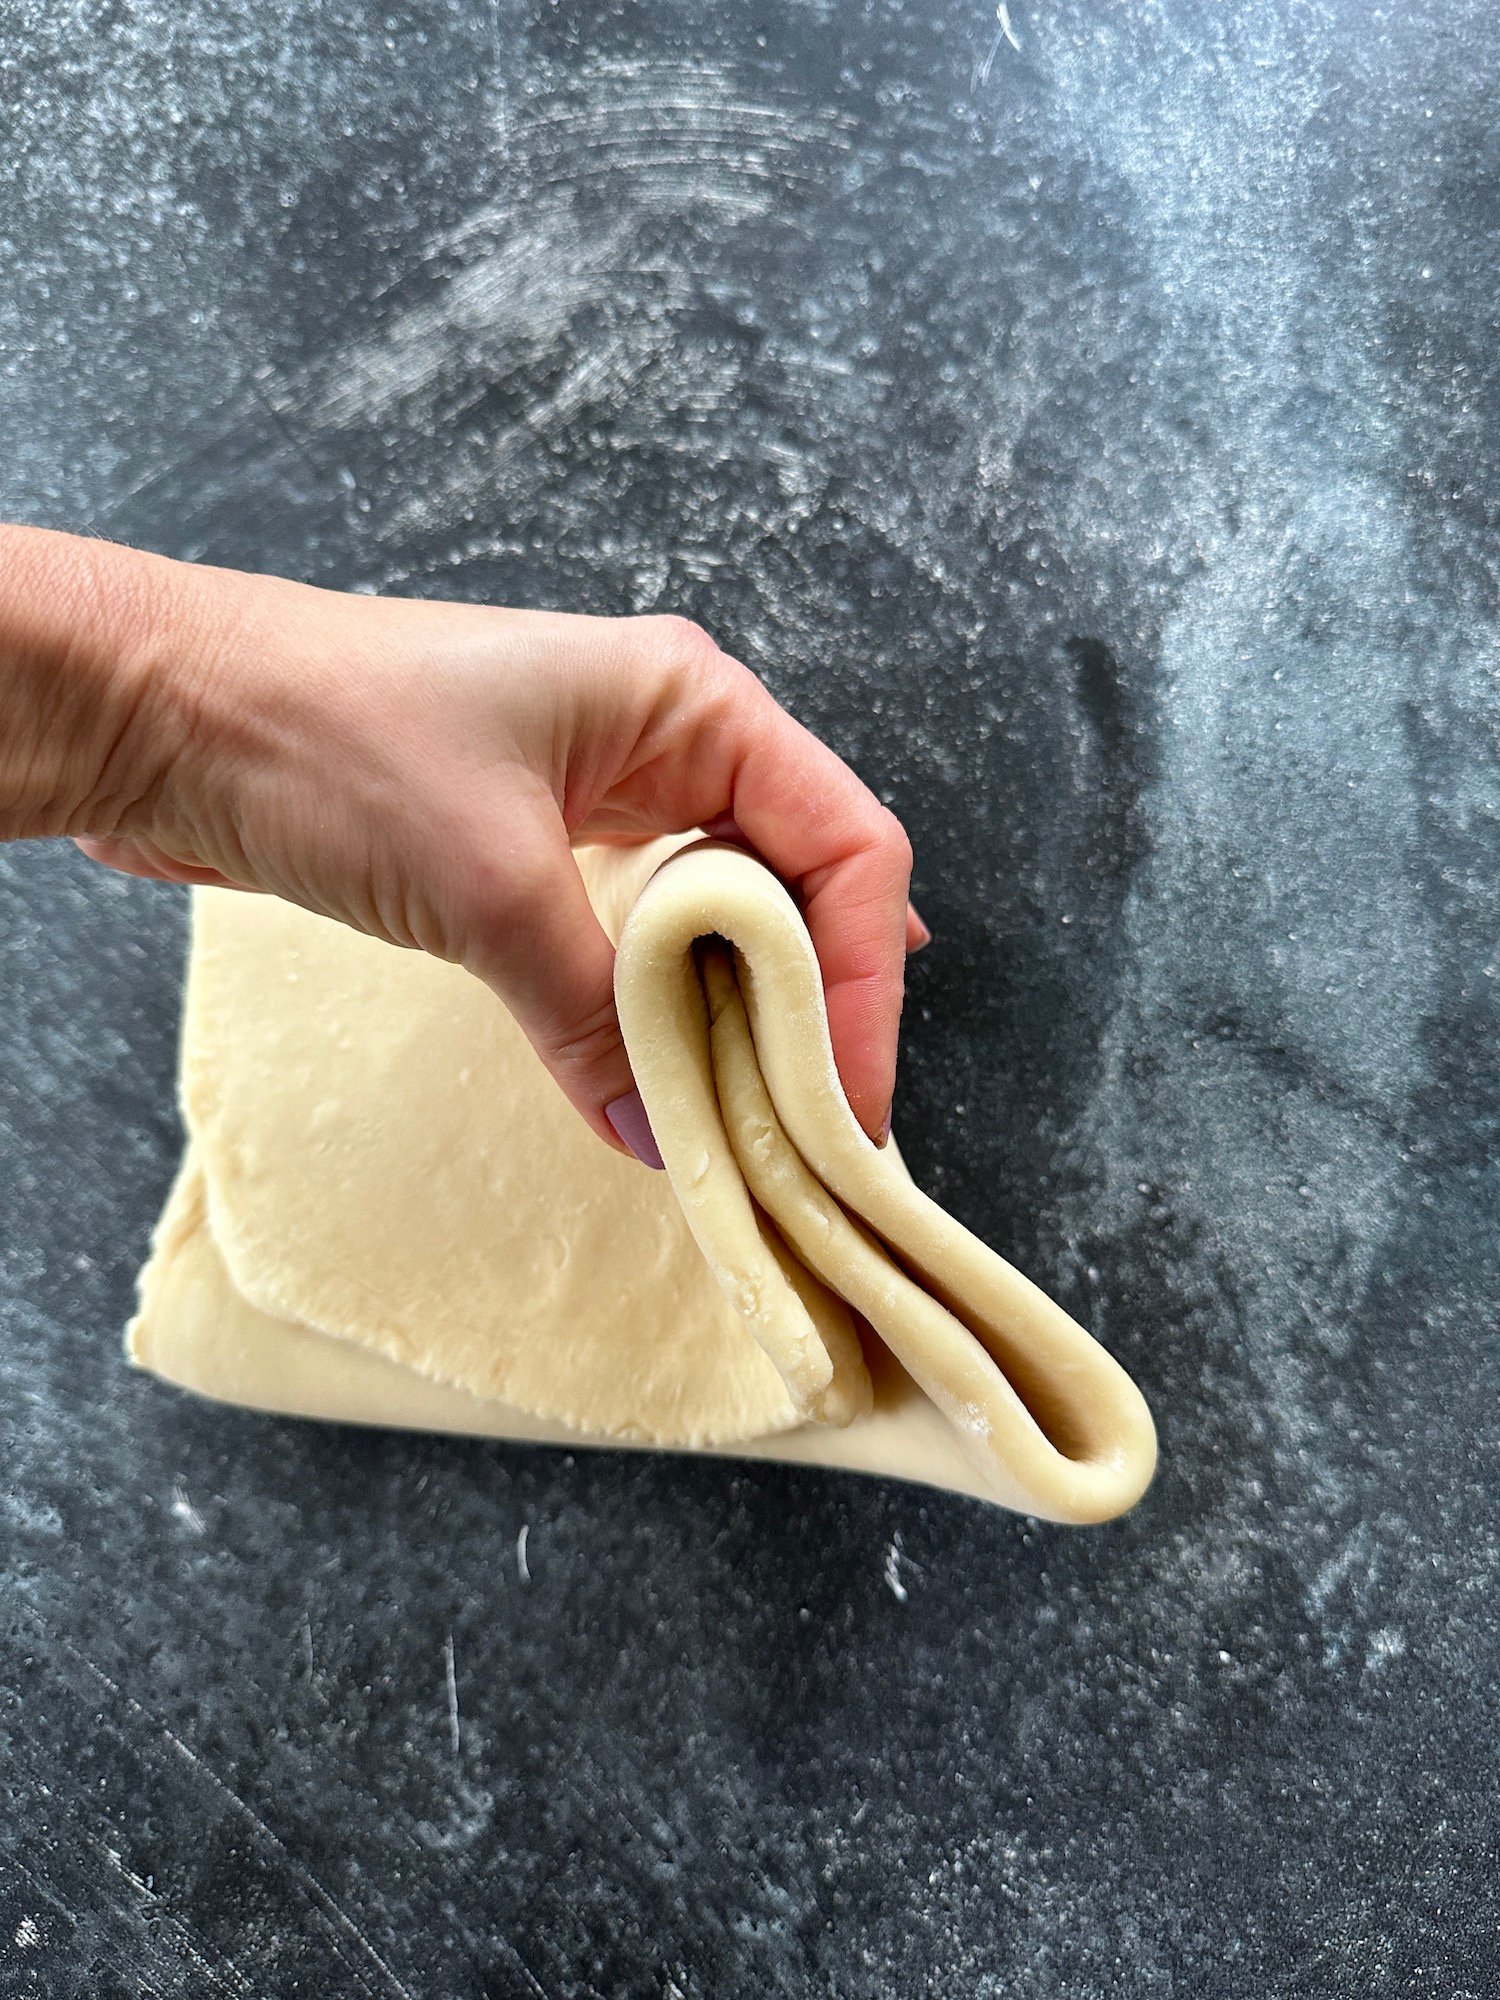

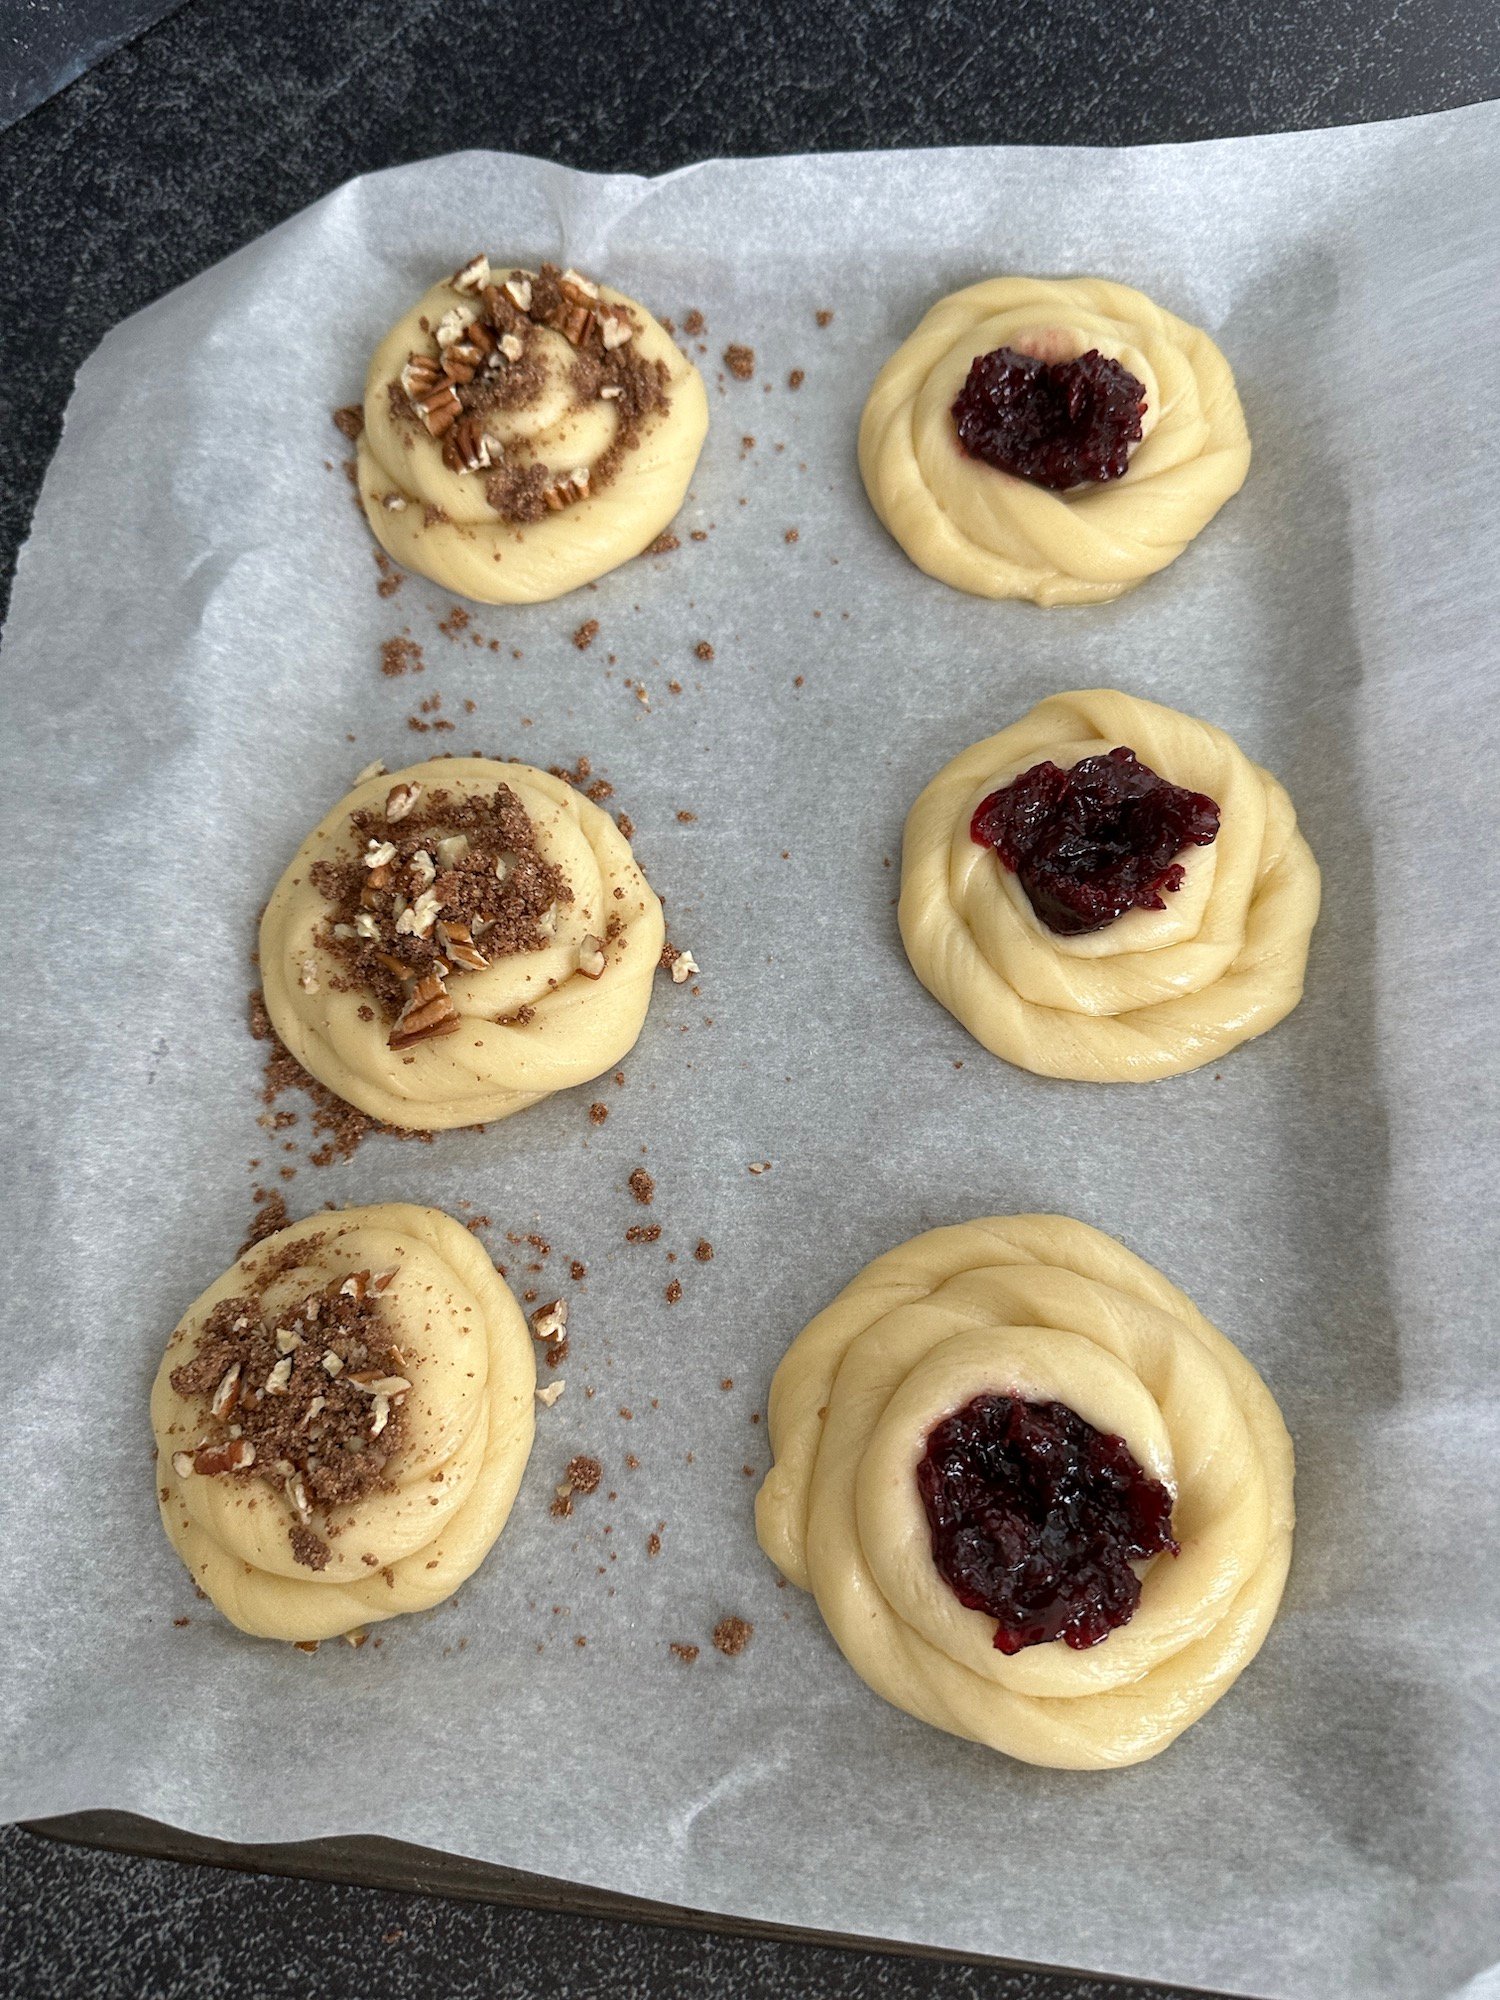
- For danishes: cut the douhg into a long strips, twist them as a snails. Choose your own filling.
Flaky Danish Dough
Ingredients
- 120 g Lukewarm milk
- Large egg
- 6 g Dry instant yeast
- 100 g Granulated sugar
- 320 g Bread Flour
- 6 g Salt
- 50 g Unsalted butter (softened completely to room temperature)
- 150 g High-fat unsalted butter (Kept ice-cold in the freezer)
- 2 tbsp Bread Flour (for stabilizing the butter shreds)
Equipment
- Stand Mixer (fitted with the dough hook attachment)
- Box Grater / Shredder (for processing ice-cold butter)
- Large Baking Sheet Pans
Method
- 8:00 PM: In the bowl of your stand mixer, combine the 120g of lukewarm milk and 1 large egg. Whisk briefly to combine. Sprinkle the 6g of dry instant yeast and 100g of sugar into the liquid, whisking steadily until fully dissolved.
- Dump all 320g of bread flour into the mixer bowl. Lock the dough hook in place and knead on medium speed for 5 to 7 minutes until the flour is completely hydrated and a uniform, cohesive dough mass forms.
- Sprinkle the 6g of salt and add the 50g of softened room-temperature butter into the bowl. Increase your mixer speed to medium-high and continue kneading continuously for roughly 15 minutes. The dough will break apart initially but will transform into an extraordinarily smooth, strong, elastic ball that completely clears the sides of the bowl.
- Remove the dough from the bowl, wrap it securely in plastic wrap, and let it proof in a warm, draft-free spot at 82°F (28°C) for exactly 1 hour.
- Transfer the wrapped dough package directly into the refrigerator to chill and rest overnight.
- 6. 8:00 AM: Remove the cold dough from the refrigerator. Lightly dust your countertop with flour and roll the dough out into a long, clean rectangle measuring roughly 20×60 cm (7.8×23.6 inches).
- 7. Working quickly so it does not melt, use a box grater to shred all 150g of ice-cold freezer butter into a bowl. Toss the butter shreds gently with 2 tablespoons of raw flour to keep them separate, then distribute the butter evenly over the surface of the sheeted dough.
- 8. The First Letter Turn: Fold the top third of the dough rectangle down to cover the middle section, then fold the bottom third up and over it (just like folding a business letter).
- 9. Turn the folded dough block 90 degrees. Use your rolling pin to roll it back out into a 20×60 cm rectangle, and complete a second letter fold sequence. Wrap tightly in plastic wrap and rest in the refrigerator for 1 hour.
- 10. 9:15 AM: Take the chilled dough out of the fridge, roll it down into a 20×60 cm rectangle for a final time, and perform one last letter fold. Wrap and chill in the refrigerator for 1 final hour to relax the gluten structure.
- 11. 10:30 AM: Remove your finished Flaky Danish Dough from the refrigerator. It is now completely ready to be customized into your favorite shapes: * For Individual Danishes: Cut the dough mass into long, uniform strips. Twist the strips tightly onto themselves and roll them into flat spiral “snail” shapes, pressing down the centers to hold a dollop of fruit jam or sweet cream cheese filling. * For Two Kringles: Cut the dough sheet down the middle into 2 long strips. Cream together 1/2 cup of brown sugar, 1/2 stick of butter, and 1/2 cup of chopped pecans. Place the filling directly down the center of each strip and pinch the outer edges tightly to seal.
- 12. Arrange your shaped pastries onto a large baking pan lined with parchment paper. Leave them to proof completely uncovered at room temperature for 3 to 5 hours until they are completely doubled in size, puffy, and fragile.
- 13. Preheat your oven to 350°F (175°C). Bake the proofed pastries for 20 to 22 minutes until the laminated crust is golden brown and flaking. Cool slightly on a wire rack before serving.
Nutrition
Notes
- The Shredded Butter Innovation: Traditional French laminations require rolling an entire solid block of cold butter into a dough jacket, which can easily crack or leak if the temperatures aren’t perfectly matched. This recipe utilizes an approachable hack: grating frozen butter onto a box grater and tossing it with 2 tablespoons of flour. This creates mini pocket layers that distribute evenly without tearing the dough webs.
- Why the Final Proof Takes 3 to 5 Hours: Laminated sweet doughs that are loaded with dairy, sugar, eggs, and heavy layers of butter require significantly longer to proof than standard bread loaves. The cold temperature from the refrigerator also slows down yeast activity. Do not rush this phase; if you bake the danishes before they have fully doubled, the butter will melt out onto the baking pan, leaving you with greasy, flat pastries.
- Sourdough Conversion Instructions: If you want to transform this recipe into a traditional wild yeast pastry, omit the 6g of dry instant yeast entirely. Instead, mix 64g of active, mature sourdough starter (calculated as 20% of the total 320g flour weight) directly into your milk and egg mixture on night one. Because natural wild yeast moves slower, extend your final shaped counter proofing window to roughly 12 to 16 hours before baking.
- Freezing the Finished Raw Dough: This dough is an excellent make-ahead option for holidays or weekend breakfasts. After completing the final rolling turn and letter fold, wrap the dough block tightly in a layer of plastic wrap followed by aluminum foil. Store it in your freezer for up to 1 month. To use, thaw the dough block in the refrigerator overnight, then shape, proof, and bake as directed the following morning.
Tried this recipe?
Let us know how it was!Disclosure: As an Amazon Associate I earn from qualifying purchases.
Discover more from Natasha's Baking
Subscribe to get the latest posts sent to your email.
Looks great. Do you think that it could be adapted to sourdough?
Thanks
Fatemah
I was wondering about that too!! I think I’ll try adding 50g of my starter instead of the yeast and see what happens! 🤷🏼
Yes, absolutely
the amount of sugar in the filling is 2 cups or 1/2 cup? I don’t really understand what !/2 mean.. thank you 🙂
Hi!
Sorry for typo. 1/2 cup
Yes, use 20% of sourdough starter from total amount of flour.
And let proof longer.
I’ve tried sourdough twice but I struggle a bit with the proof. I’m almost there but all the recipes say proof 3-4 hours and I let my sweet croissants proof overnight so I will try that next time and see if I can get them puffier
Yes, with sourdough and laminated dough, proofing should take about 12-16 hours
There were pictures of the Kringle shaping and danishes proofing that are no longer posted. Would it be possible for you to show them to us please?
Thank you!
Hello would provide standard measurements? I am not very good with the metrics system. Thank you so much. Leticia
Sorry I’m using metrics for more accurate results.
There are excellent Metric to Imperial converters online, but Metric is much more accurate, especially when multiplying or dividing formulas and recipes.
Thank you 🙏
Do you think you could squeeze in the laminations on day-one (with an extended proof during the day) then proof the laminated dough overnight, so in the morning there was just shape, proof and bake?
I think you should try it.
But make sure when mixing the dough, develop enough elasticity.